April 8th, 2012 at 3:22 pm
Hello everyone,
In the past year and a half or so I’ve repaired over 350 computers. In this series I’m describing the very repair tools that I use daily. If you would like, you can see the entire series (up to this point) by following these links: part 1, part 2, part 3, part 4, part 5, part 6, part 7, part 8, part 9, part 10, part 10.1, part 10.2, part 10.3 and part 10.4.
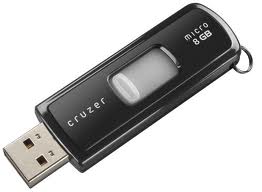
Part 10.5: Continuing what I started in part 10, 10.1, 10.2, 10.3, and 10.4, in the next few posts I’ll continue to show you the repair tools that I have on my USB flash drives and tell you what they are used for. At the moment I carry around six USB drives so let’s take a look at some more programs that I have on flash drive #3:
1) Tech Tools 3.0: Tech Tools has been extremely useful to me! Imagine having a bunch of great, free repair tools that you can update automatically to the most recent version!
Tech Tools is for techs and people who work on computers everyday, and need updated programs to keep with them on their usb key. Tech Tools uses Ketarin, which is an application downloader that checks to see if an application has been updated and downloads it if so. The genius in this tool is that we don’t have to have you download all these tools at one time from our website, you’re going to be downloading each file individually from the app’s website. This helps with our bandwidth costs and some authors of the applications, while freeware, wanted the only download of their software to be at their own sites.
2) LiberKey 5.7: A selection of great portable apps with automatic online updates. You gotta check this one out!
LiberKey is a collection of portable apps in a variety of categories that can be run on your local PC or from any portable media. Take these important apps with you and use on any computer. LiberKey is a complete application platform for local or portable use. It allows you to manage your applications quickly and without skill. Installation of an application from LiberKey catalog is done with 2 clicks but you can easily add any other application. After LiberKey 5.7 installation, the user has the choice to install Ultimate, Standard or Basic suites (so always updated) or to define its own suite with the online catalog.
3) CheckDisk: This tool will save you a lot of time! CheckDisk automates the Windows chkdsk.exe command line tool to run until no bad sectors, lost clusters, cross-linked files, or directory errors are found.
How would you like coming back to a system after running chkdsk.exe and still having file system errors? It can get irritating for the 20 minutes to several hours it takes chkdsk.exe to run, to have to check in on it and restart chkdsk manually 3-5 times or more. CheckDisk will use chkdsk.exe to scan the partitions as many times as it takes until chkdsk.exe reports that no errors are found, so the only user interaction required is to start the process.
Ultimately, this is a technician’s tool. It’s great for those of us running chkdsk.exe from a “Tech Bench” computer or bootable WinPE based CD, where you don’t *need* to scan your OS partition.
…but it can be quite useful for others. Anyone with multiple partitions and hard drives will find it useful for maintenance on all of their non-OS partitions, and in the event their OS partition needs repair, you can use it to schedule autochk.exe to run on the next startup.
4) ClamXav 2 and FlashbackChecker: I have not had to use either of these tools yet but I have them on my flash drive just in case I have to work on an Apple system (malicious website code can exploit a vulnerability in Java runtime).
ClamXav is a free virus scanner for Mac OS X. It uses the very popular ClamAV open source antivirus engine as a back end and has the ability to detect both Windows and Mac threats. ClamXav can be setup up as passive or active: scan only the files you tell it to or your entire hard drive, whichever you prefer; you can also choose to activate Sentry to monitor your hard drive and scan new files as they arrive.
FlashbackChecker checks and reports the presence of Flashback malware, it does not remove it!
5) Memtest86+: I can’t tell you how many times I have tested and diagnosed bad memory using this gem of a tool. Memtest86 on your flash drive is simply a must!
Memtest86 is a thorough, stand alone memory test for x86 architecture computers. BIOS based memory tests are a quick, cursory check and often miss many of the failures that are detected by Memtest86.
Professor Randy says: A computer repair technician without great tools is like milk without cookies! Pointless! Fill your flash drive up with great tools and you’ll have the solution to the problem in the palm of your hand!
Tags:
computer repair tools,
repair utilities on a usb flash drive,
troubleshoot and diagnose computer problems from a usb flash drive
April 5th, 2012 at 7:59 pm
Hello everyone,
Every time I install an Operating System, I also have to install several drivers.
A driver is a software program that runs (drives) a hardware device. Think of it as a program that controls a particular type of device that is attached to your computer. There are many hardware devices both inside and outside of a computer and these devices cannot run unless they are “controlled” by a device driver. Here are some examples of computer hardware devices that will not function without the software that “communicates” with them.
- printers
- video adapters
- network cards
- sound cards
- mice, keyboards, USB drives
- computer storage devices such as hard disk, CD-ROM
- image scanners
- digital cameras
Most people know that when you install/reinstall an Operating System you must also install/reinstall the most recent, updated drivers for all of your hardware. But do you know that you must also install those drivers in the correct order for optimum system performance?
Today I would like to show you the correct order of device driver installation. This driver installation order refers to machines running the Windows Operating System.
Install/Reinstall your device drivers in this order:
1) Desktop System Software (DSS) or Notebook System Software (NSS). The DSS and NSS software is not required for Windows Vista/Windows 7 systems.
2) Chipset
3) Video Adapter
4) Network Interface Card (NIC)
5) Audio Adapter
6) Dialup Modem
7) Wireless Network Card
8) Touchpad, Pointer, Trackstick, Mice, and Keyboards
9) Bluetooth Module, Wireless Mobile Broadband Cards, PCMCIA/Smartcard Controller
Professor Randy says: The best hardware device in the world will not run without its proper device driver. Install the correct drivers and install them in the correct order for optimum system efficiency!
Tags:
correct order of device driver installation,
device driver installation,
how to install device drivers
April 1st, 2012 at 12:26 pm
 Hello everyone,
I'll be presenting at the Cumberland Plateau PC Users Group on Monday, April 16. If you're in the area please stop by. I would love to meet you!
Program: “Clean, Speed Up and Optimize Your Windows PC”
The Plateau PC Users Group will meet Monday Apr 16, at the 127 South Senior Center, located at 1460 South Main Street in Crossville. NOTE SUMMER MEETING TIME IS 6 PM.
The program topic is: HOW TO OPTIMIZE YOUR WINDOWS PC BY KEEPING IT CLEAN
Spring is clean up time and computers also need routine cleaning.
Randy Knowles is a local computer tech who owns his own computer consulting business which he has been running full and part time for almost 3 years now. He also writes the blog Randy the Tech Professor, where he provides near daily tech tips, tricks, and news for novices and advanced troubleshooters alike.
Subtitle: Keep your PC running fast as possible by keeping your computer clean and optimized.
Some of the things that will be discussed:
Remove all old games and applications…
Review your startup programs…
Clear your browser cache, cookies and history…
Remove Junk Files…
Clean your Temp folder and File History…
Remove Spyware and Adware
Fastest Windows OS Settings…
Fastest Desktop Settings…
Run Scan Disk on your hard drive…
Defragment your hard drive…
Hope to see you there!
Randy Knowles
Tags:
how to teach computer basics,
presenting at the local computer club,
teach computer basics
March 31st, 2012 at 11:13 pm
 Hello everyone
A client gave me an old computer that would not boot up. The monitor screen was absolutely dead, totally black, no BIOS screen, nothing (I was using my own monitor that I knew was 100% good). I didn’t immediately know what was causing this problem so I had to spend almost all day troubleshooting in order to come up with the correct diagnosis.
Here are the exact steps that I took (in this exact order) to figure out what was wrong:
- I pressed the power button and saw that the screen was dead, totally black, nothing.
- I was getting power (fans were spinning, HD was spinning up, CD/DVD drive trays were working), so I concluded that the Power Supply was OK (I did actually try a new Power Supply just in case but still no screen).
- I heard no unusual beeping at start-up (certain beep sequences are an indication of bad RAM).
- I reseated and then replaced the Video Card with a new one but still nothing on the screen.
- I reseated and then replaced the RAM memory modules but still nothing on the screen.
- I checked the CPU (it was seated correctly and the fan on the heat sink was running).
- I tried a different IDE Hard Drive cable but still no screen.
- I tried another CPU but still no screen.
- I had known previously that the Hard Drive was good.
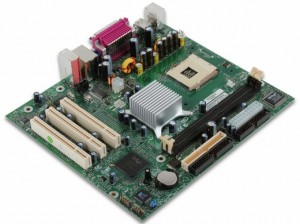
- Final Conclusion: Bad Motherboard! (time to order a new one, like this one).
Professor Randy says: It may be tedious, but don’t skip any steps when troubleshooting a computer problem. Your thoroughness will be eventually appreciated by your clients and your reputation for excellence will lead to a successful business!
Tags:
diagnose bad motherboard,
hardware failure,
hardware repair,
troubleshoot dead screen
March 30th, 2012 at 5:34 pm
Tags:
latest tech information
March 6th, 2012 at 8:47 pm
Hello everyone,
Note: Part 2 (October 2014) of this post can be found here. Part 3 (June 2015) can be found here.
I have run into this situation twice in the past week:
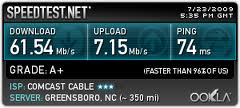
Both people had signed up for Comcasts XFINITY Extreme 50 High Speed Internet (50 Mbps download speed), but neither were getting the promised speeds. In fact they were only getting about half (24 Mbps) of what they were paying Comcast for. What was going on here? Was it Comcast again?
Actually no! I found out that two essential things were missing from each persons network setup:
1) The Modem: If your Comcast connection rate is 20 Mbps or greater your modem should be a DOCSIS 3.0 Cable Modem. Once again, you must use a DOCSIS 3.0 Modem in order to take full advantage of Comcast’s fast Internet speeds! You can rent one from Comcast or buy your own. I recommend buying your own.
2) The Router: Your router must have both LAN and WAN Gigabit functionality. The WAN Ethernet 10/100/1000 Gigabit ports are for establishing a wired connection to your broadband Ethernet-enabled DOCSIS 3.0 modem. The LAN Gigabit Ethernet ports are for establishing high-speed wired connections to your desktop PC. Once again, connect the router to the cable modem through a Gigabit WAN port, and connect your other PCs, servers, wireless-N access points, or anything else to the LAN Gigabit Ethernet Ports.
Once the DOCSIS 3.0 Modem and the Gigabit Router were hooked up, download speeds of over 50Mbps came flowing in!
Professor Randy says: Don’t buy a router that doesn’t have both LAN and WAN Gigabit ports, and don’t expect extreme Comcast download speeds without a DOCSIS 3.0 Modem!
Tags:
comcast 50 Mbps download speed,
docsis modem,
gigabit router,
LAN and WAN gigabit ports,
network optimization
March 2nd, 2012 at 3:47 pm
Tags:
latest tech information
February 26th, 2012 at 12:21 pm
Hello everyone,
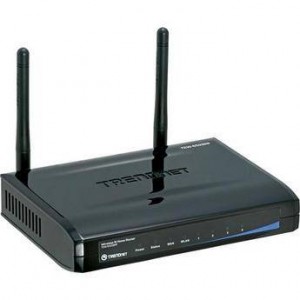
I love routers! Do you really know all that your router can do? A modern router has multiple “cool” functions that many people don’t realize? Many of my elderly clients don’t understand what a router is or why they need one. This is what I tell them:
1) A router “pure and simple” is a device that passes data (such as web pages and email) between the home computer and the cable or DSL modem which connects to the Internet (through your Internet Service Provider). A router makes things much more secure because all Internet data must first pass through the routers firewall instead of going directly into the machine. The Internet can’t initiate communication with the computer – it’s gotta go through the router first. A router is like having a lock on a door. Don’t ever let the Internet into your machine without first passing through a router. A router can help prevent “malicious” information from entering your beloved computer! Great stuff!
2) A router can also function as a Wireless Access Point. Modern routers have a built in network adapter, antenna and radio transmitter. The router can relay data between wireless computers and printers and any wired devices on the network. The Kindle is a wireless device and the router allows it to connect to a wired network using Wi-Fi. Take your laptop anywhere in the house and connect to the Internet without wires. How awesome is that?
Also a lot of home entertainment now has built in networking. It’s hard to buy a new flat screen television nowadays that doesn’t have a wireless capability built in. If your television can connect to your network and access the Internet, you can watch movies (think Netflix) directly streamed online through your network, through your wireless, to your television. Now that is cool!
That’s not all. Do you know that you can actually get a wireless security camera that will connect to your router/Internet? This will allow you to check up on your home on any computer wherever you may be when you are away. Amazing!
3) The router can also function as a Switch. Most modern routers have physical network ports on the back that you can plug multiple systems into. Usually a home router will have four LAN (Local Area Network) ports on the back for wired connections. If you have eight systems you can just add another Switch to one of the LAN ports and you will have eight computers wired into one router. In fact you can keep adding Switches until you have over 200 systems physically interconnected. How cool is that?
Professor Randy says: Don’t ever connect to the Internet without hooking up a router to your modem. A router will protect you from malicious attacks, give you wireless capabilities, and allow you to connect more PCs to your network.
Tags:
network security using a router,
router as a switch,
router functions,
wireless access point
February 10th, 2012 at 10:43 pm


Hello everyone
In the past year and a half or so I’ve repaired over 350 computers. In this series I’m describing the very repair tools that I use daily. If you would like, you can see the entire series (up to this point) by following these links: part 1, part 2, part 3, part 4, part 5, part 6, part 7, part 8, part 9, part 10, part 10.1, part 10.2, and part 10.3.
Part 10.4: Continuing what I started in part 10, 10.1, 10.2, and 10.3, in the next few posts I’ll continue to show you the repair tools that I have on my USB flash drives and tell you what they are used for. At the moment I carry around six USB drives so let’s take a look at some more programs that I have on flash drive #2:
1) RKill: RKill has been great to me! How can I attack malware while the malware processes are still running? RKill is a program that was developed at BleepingComputer.com that attempts to terminate known malware processes so that your normal security software can then run and clean your computer of infections. When RKill runs it will kill malware processes and then import a Registry file that removes incorrect file associations and fixes policies that stop you from using certain tools. When finished it will display a log file that shows the processes that were terminated while the program was running.
As RKill only terminates a program’s running process, and does not delete any files, after running it you should not reboot your computer as any malware processes that are configured to start automatically will just be started again. Instead, after running RKill you should immediately scan your computer using some sort of anti-malware or anti-virus program so that the infections can be properly removed.
RKill is available to download under different filenames. RKill is offered under different filenames because some malware will not allow processes to run unless they have a certain filename. Therefore when attempting to run RKill, if a malware terminates it please try a different filename .
2) SUPERAntiSpyware Portable Scanner: I still use this program on almost every infected machine. The portability makes it awesome! SUPERAntiSpyware Portable Scanner features a complete scanning and removal engine and will detect AND remove over 1,000,000 spyware/malware infections. The scanner does NOT install anything on your Start Menu or Program Files and does NOT need to be uninstalled.
The scanner contains the latest definitions so you DO NOT need Internet Access on the infected system to scan. The scanner is saved under a random filename so that malware infections won’t block the scanner.
3) Malwarebytes Anti-Malware Free: This is a great malware removal tool. There is no portable version so you should download the latest version (use another computer if necessary), then boot into safe mode w/networking (if possible) to update. Run a full scan in safe mode and then another in normal mode. I’ve never seen Malwarebytes conflict with any other antivirus program (free or paid). Another great thing about MBAM is that the program blocks access to known malware sites. Many legitimate sites contain a trojan in script form that targets the Windows operating system. It looks for vulnerabilities in Adobe Reader and Acrobat, Java, QuickTime, and Flash and launches fake antivirus warnings.
4) Microsoft Standalone System Sweeper: I have this on a seperate 1GB SanDisk Cruzer Micro. Microsoft Standalone System Sweeper Beta (MSSS), is a recovery tool that can help you start an infected PC and perform an offline scan to help identify and remove rootkits and other advanced malware. MSSS uses the same definitions as Microsoft Security Essentials.
You can download MSSS from Microsoft Connect and create a bootable media using CD/DVD or your USB drive. The bootable media starts the Windows Preinstallation Environment and launches the Microsoft Standalone System Sweeper application for scanning and removal of virus and malware. MSSS runs in Windows XP SP3, Windows Vista and Windows 7.
5) Trojan Remover: This great program has pulled me out of a jam on quite a few occasions! Most modern Malware programs are memory-resident, which makes their de-activation more difficult. How many times have you been told to start your computer in “Safe” Mode, or even worse, in DOS? Trojan Remover does all this for you. When it finds Malware that is memory-resident, Trojan Remover automatically re-starts (on request) your system and completely DISABLES the Malware before Windows restarts. Trojan Remover scans ALL the files loaded at boot time for Adware, Spyware, Remote Access Trojans, Internet Worms and other malware. Trojan Remover also checks to see if Windows loads Services which are hidden by Rootkit techniques and warns you if it finds any.
Professor Randy says: A computer repair technician without great tools is like milk without cookies! Pointless! Fill your flash drive up with great tools and you’ll have the solution to the problem in the palm of your hand!
Tags:
computer repair tools,
repair utilities on a usb flash drive,
troubleshoot and diagnose computer problems from a usb flash drive
February 4th, 2012 at 1:25 pm

Hello everyone,
I really never thought I’d be writing a post about dial-up access, but here I am! A nice lady called me the other day and asked me if I could take a look at her non-functioning dial-up connection. She lived in a rural area of Tennessee and had no other way to connect to the Internet. It’s only the second time that I’ve had to deal with a dial-up situation in the past three years, so I was excited about doing something different! Here’s what I found:
1) Her ISP was EarthLink and she had installed the EarthLink “dialer software” from a CD. She was paying EarthLink $9.95 a month for the access.
2) Every time that I activated the EarthLink software I noticed that her CPU would max out at 100% and the computer would of course “freeze/hang”.
3) I took a look at the EarthLink software and noticed that it had come bundled with all kinds of unnecessary “features” (a.k.a. “crap”). Stuff like EarthLink Protection Control Center, EarthLink Toolbar, EarthLink Accelerator, and maybe even a couple of other things!
4) I took a look at the old computers CPU and saw that I was dealing with a AMD Athlon working at a “whopping” 1.20 GHz!!
5) I didn’t have to look anymore. I uninstalled all of the EarthLink software and created a simple dial-up connection in Windows XP. I did this:
Create a new dial-up connection
- To start the Network Connections tool, click Start, click Control Panel, double-click Network Connections, and then click Create a new connection in the left pane.
- Click Set up my connection manually, click Next, click Connect using a Dial Up modem, and then click Next.
- Type a descriptive name for the Internet service provider (ISP) that you are using in this connection, and then click Next.
- Type the phone number that was provided to you by your ISP. Note that you may need to check with your ISP about long distance or access charges. Click Next.
- Choose whether you want this connection to be shared by all users (Anyone’s use) of this computer, or only for yourself (My use only).
- In the next screen, type the logon information that was provided by your ISP to access their service.
- Click Next, and then click Finish to end the setup process.
6) Case closed! Right click the dial-up connection that now appears in the network connections area of the control panel (or better yet put a shortcut on your desktop), enter the three pieces of information that is required by your ISP (usually ISP username, ISP password, and the local ISP access number to dial). And you my friend will connect to the Internet “as smooth as silk”.
Professor Randy says: Don’t use the “dialer software” that is supplied by your Internet Service Provider! It will slow your computer down and waste precious bandwidth. Create a dial-up connection yourself by using the above method. Enjoy!
Tags:
dial-up internet access,
ISP dialer software,
optimize a dial-up internet connection,
windows dial-up connection


